If you are confused as to why we're halfway through a tutorial, you might have figured out you need to go back to part 1.
Now that we are back on track, let's start talking about how to add the pipes to the game.
Obstacles as Prefabs
We need to add obstacles to the game world. This section helps to understand how to make obstacles into prefabricated resources, also know as Prefabs, and then instantiate and control the movement of these obstacles from JavaScript code.
Note: It is crucial to understand the importance of Prefabs. Please make sure to read the Prefabs
Implementing
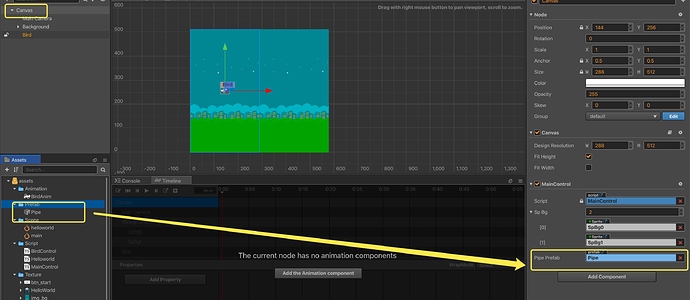
First, create an empty Pipe node, and then create two Sprite child nodes to the Pipe, as shown in the following figures:
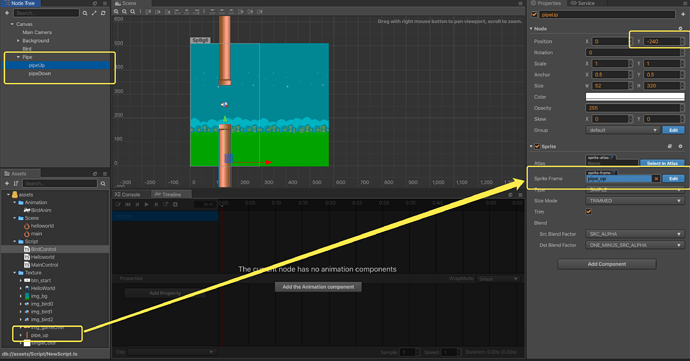
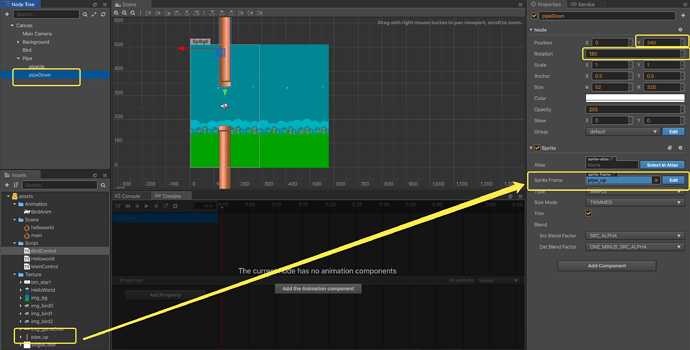
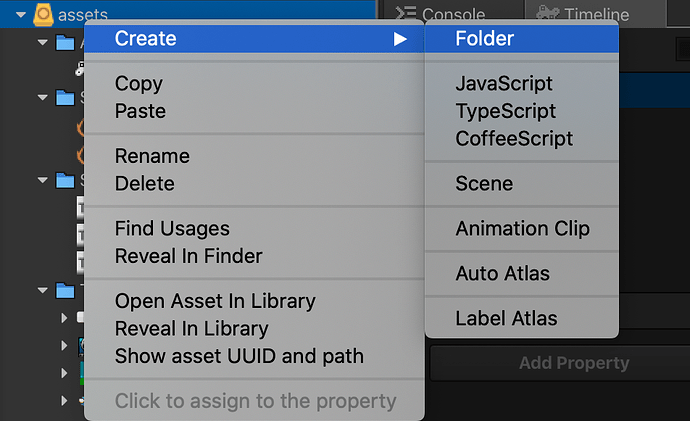
Next, create a Prefab directory under the assets directory (used to put all prefab resources for this game).
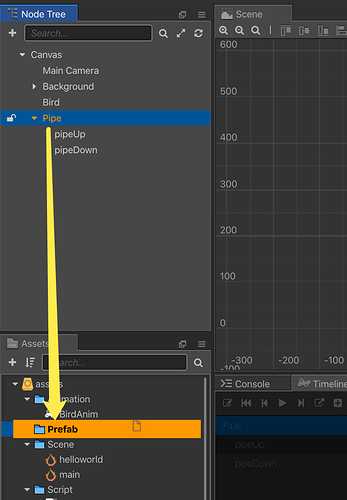
Third, drag the Pipe node into the Prefab directory, and then a Pipe prefab resource will be generated in the Prefab folder.

Fourth, delete the Pipe node under the Canvas node and use code control to generate and move directly in the script. Add the following code to MainControl.ts:
    @property(cc.Prefab)
    pipePrefab: cc.Prefab = null;

    pipe: cc.Node[] = [null, null, null]

    start () {
        for (let i = 0; i < this.pipe.length; i++) {
            this.pipe[i] = cc.instantiate(this.pipePrefab);
            this.node.addChild(this.pipe[i]);

            this.pipe[i].x = 170 + 200 * i;
            var minY = -120;
            var maxY = 120;
            this.pipe[i].y = minY + Math.random() * (maxY - minY);
        }
    }
The first pieces of code: declare a prefab in the MainControl script, and modify it with @property (cc.Prefab) to display it in the IDE's MainControl script.
The second piece of code: declares an array of type cc.Node with a length of 3, which is 3 pipe obstacles.
The third piece of code: the start() function is one of the Cocos Creator life cycle functions, and it is triggered after the onLoad() function is triggered. start() is usually used to initialize some intermediate state data, which may change during update() and is frequently enabled and disabled. Instantiate the pipe array with the pipe prefab in the start( ) function, and add these 3 instantiated nodes to the Canvas node. Lines 42 to 45 of the code assigned values to the three pipes. The x coordinate is placed at intervals of 200 pixels, and the y coordinate is random within the range of (-120, 120).
Add the following code to MainControl.ts in the update() function:
        // move pipes
        for (let i = 0; i < this.pipe.length; i++) {
            this.pipe[i].x -= 1.0;
            if (this.pipe[i].x <= -170) {
                this.pipe[i].x = 430;

                var minY = -120;
                var maxY = 120;
                this.pipe[i].y = minY + Math.random() * (maxY - minY);
            }
        }
This code mainly moves 3 pipes to the left by 1 pixel per frame. When a pipe moves out of the screen from the left (the abscissa is less than or equal to -170), the abscissa of this pipe is assigned a value of 430, and then height is re-acquired.
Save your progress
Save your changes in the text editor that you are using. Find the Save button in Cocos Creator and click Save once.
Read about our physics system
Cocos Creator has a built-in physics system. This game simply uses the Collider component, part of the collision component in the physics system.
For further learning, please review the: Collision documentation.
Adding Collider Components
First, we need to add a Collider component to our bird:
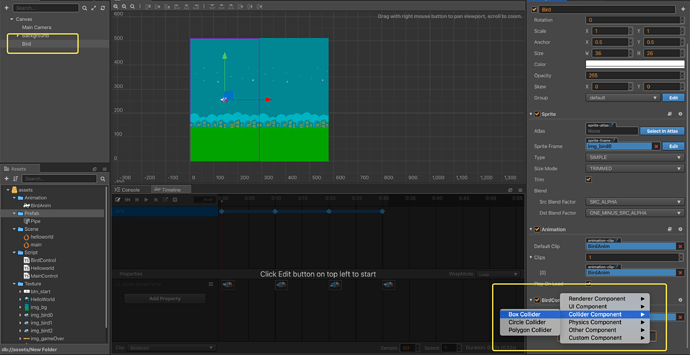
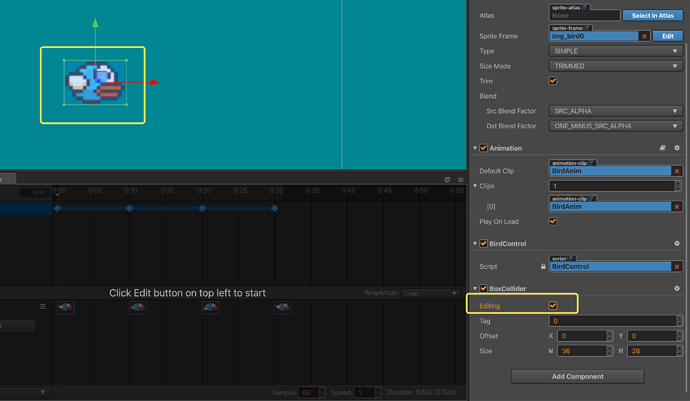
Second, we should use the BoxCollider component directly. The editing option is unchecked by default. If it is checked, we can see that there is a green box around the bird. You can use the mouse to change the size of the collision body. In this game, we can just use the default size, there is no need to change this adjustment.
Next, double-click the prefab resource to enter the prefab editing interface. We need to add a collision body to the obstacle:
Fourth, add collision components to both the upper and lower pipes, then save and return to the scene for editing.
Fifth, double-click the MainControl.ts TypeScript file and edit the code:
    onLoad () {
        //open Collision System
        var collisionManager = cc.director.getCollisionManager();
        collisionManager.enabled = true;
        //open debug draw when you debug the game
        //do not forget to close when you ship the game
        collisionManager.enabledDebugDraw = true;
    }
Adding the above code to the onLoad() function does two main things:
1: It enables collision detection (the detection is disabled by default). Only nodes with collision components attached will be checked for collision in the game.
2: It enables Debug mode, so we can see the shape and size of the collision body of the node.
Save your progress
Save your changes in the text editor that you are using. Find the Save button in Cocos Creator and click Save once.
Birds and obstacles are surrounded by white lines, which is the shape of the collision body. By looking at the above .gif notice the collision body will move and rotate with the node.
Continuing with collisions
Next, open the BirdControl.ts TypeScript file and add the following code:
    onCollisionEnter (other: cc.Collider, self: cc.Collider) {
        //game over
        cc.log("game over");
    }
The onCollisionEnter() function is the callback function of the engine’s default collision start event. Each node that implements a collision body will trigger this function when a collision starts.
The above code indicates that after a bird collision, a game over message is output to the console. You can open a browsers console by using Command + Option + I or Ctrl + Shift + I.
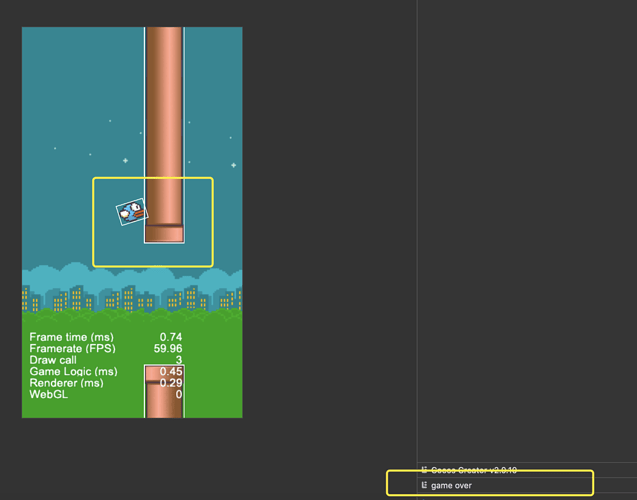
When you see the console output game over, it means that the onCollisionEnter() function in BirdControl.ts has been triggered when the bird and the pillar come into contact.
However, the player does not know that the game is over. We will continue to make our game more playable in the next sections.
Save your progress
Save your changes in the text editor that you are using. Find the Save button in Cocos Creator and click Save once.
Better logic
In the previous tutorial, we added code to output on the console when the game is over. This tutorial builds on this to improve the logic for ending the game.
First, add a Sprite node to the Scene. This Node will be used to display the gamemOver sprite.
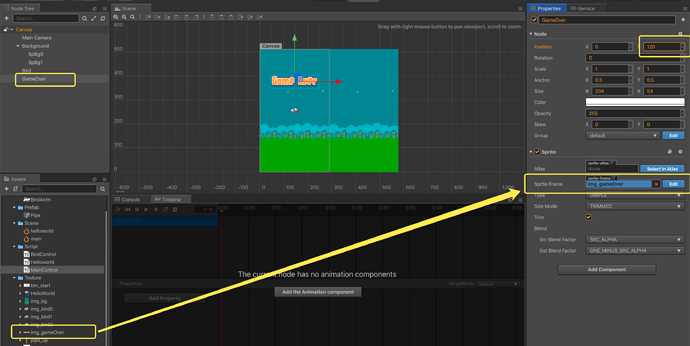
Modify the MainControl.ts script file to add the following code:
onLoad() {
    // open Collision System
    var collisionManager = cc.director.getCollisionManager();
    collisionManager.enabled = true;
    // open debug draw when you debug the game
    // do not forget to close when you ship the game
    collisionManager.enabledDebugDraw = true;
    // find the GameOver node, and set active property to false
    this.spGameOver = this.node.getChildByName("GameOver").getComponent(cc.Sprite);
    this.spGameOver.node.active = false;
}
The above code accomplished the following:
- Declare a
spGameOversprite. Note that@property (cc.Sprite)is not used at this time. This is mainly to access the component in other ways. - Initializes
spGameOversprite. This happens by first getting the node namedGameOver, and then getting thecc.Spritecomponent through thegetComponentAPI interface. You only need to get the node here, because the active attribute is the node. Assigning the active attribute to false would hide the node.
When the game ends, it is OK to display the spGameOver sprite.
Modularity and referencing modules
However, the collision event is triggered in the BirdControl.ts script. How can the MainControl.ts script know about this event being triggered? The concept of modularity and how to reference modules.
First, add a gameOver function to the MainControl.ts script. Add the following code to the MainControl.ts:
gameOver () {
    this.spGameOver.node.active = true;
}Second, modify BirdControl.ts as follows:
import MainControl from "./MainControl";

const {ccclass, property} = cc._decorator;

@ccclass
export default class BirdControl extends cc.Component {

    // Speed of bird
    speed: number = 0;

    // assign of main Control component
    mainControl: MainControl = null;

    onLoad () {
        cc.Canvas.instance.node.on(cc.Node.EventType.TOUCH_START, this.onTouchStart, this);
        this.mainControl = cc.Canvas.instance.node.getComponent("MainControl");
    }

    onCollisionEnter (other: cc.Collider, self: cc.Collider) {
        // game over
        cc.log("game over");
        this.mainControl.gameOver();
    }
The above code accomplished the following:
- Import the
MainControlmodule into the current module. - Declare a variable of type
MainControl(only the first block of code is written here, the type ofMainControlcan be recognized). - Get a reference to the
MainControlscript component in theonLoad()method. - When a collision occurs, use the
MainControlscript to reference the object to call in thegameOver()function. TheMainControlmodule receives the message that the game is over.
At this step, running our tutorial should look similar to this:
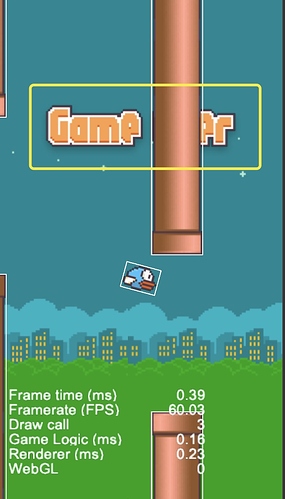
When the bird collides with the pillar, the GameOver sprite is displayed, but it was blocked by the pillar. This is because the pillar is added to the Canvas node after the game is started, therefore it is rendered after the GameOver sprite.
Final touches
First, to fix the rendering order, create an empty Pipe node and drag this Pipe node to the top of GameOver.
Next, modify the following code in the MainControl.ts script. Get the node named Pipe, and add all the instantiated pipes to the Pipe node. This will cover the pipes by the GameOver sprite.57590×518 19.7 KB
581248×488 49.9 KB
start () {
    for (let i = 0; i < this.pipe.length; i++) {
        this.pipe[i] = cc.instantiate(this.pipePrefab);
        this.node.getChildByName("Pipe").addChild(this.pipe[i]);

        this.pipe[i].x = 170 + 200 * i;
        var minY = -120;
        var maxY = 120;
        this.pipe[i].y = minY + Math.random() * (maxY - minY);
    }
}
So where are we?
At this step, our tutorial should look similar to this:
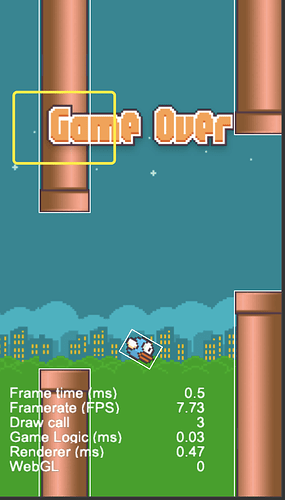
Save your progress
Save your changes in the text editor that you are using. Find the Save button in Cocos Creator and click Save once.
Adding game state
First, add a start button to the scene:
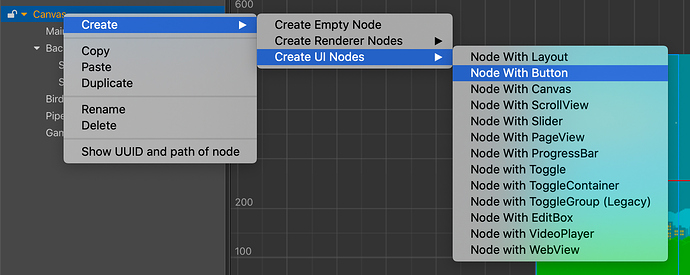
When the button is clicked, the effect is changed to a zoom effect.
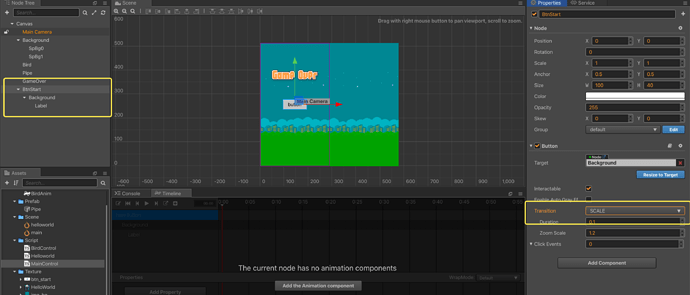
Second, add a background image to the button.

Third, delete the Label node above the button.
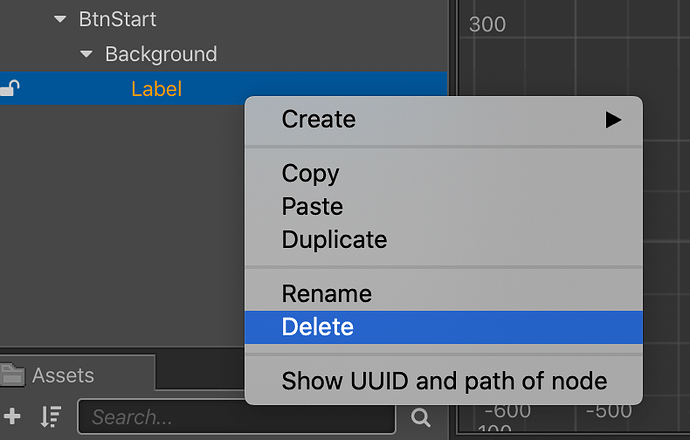
These steps create a button named BtnStart and added it to the Canvas node.
Fourth, modify the MainControl.ts script to add the above code:
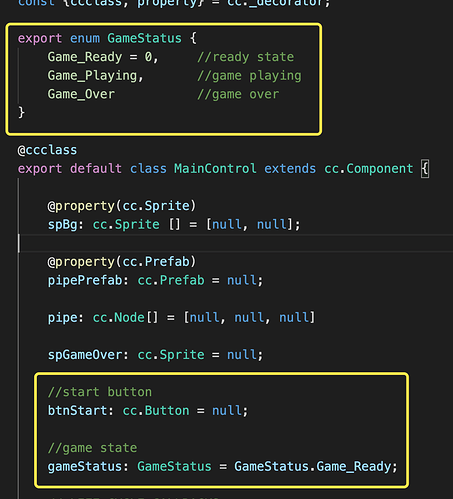
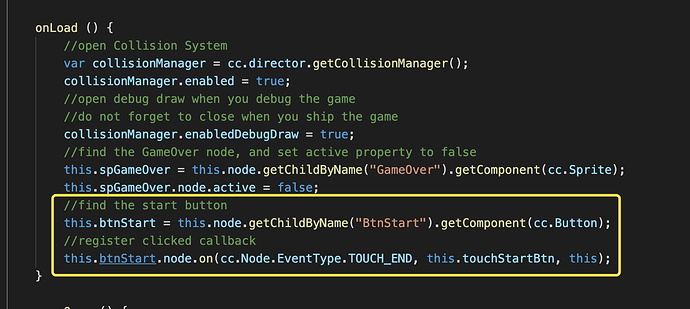
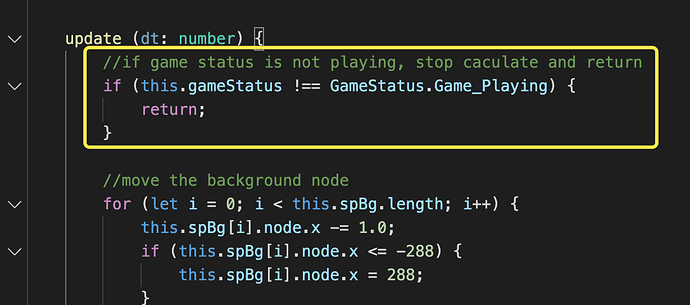
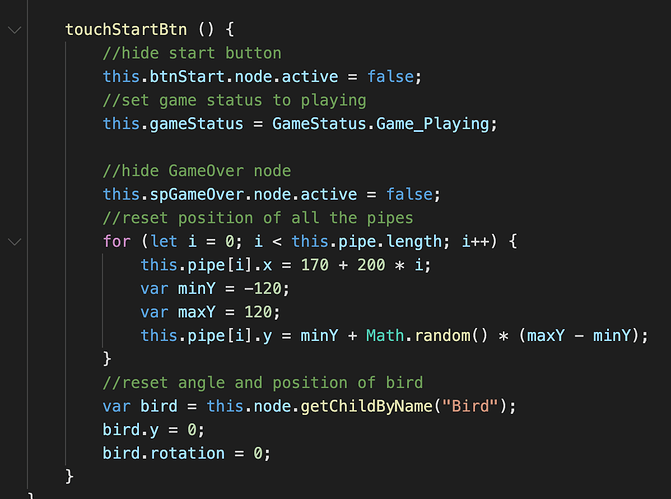
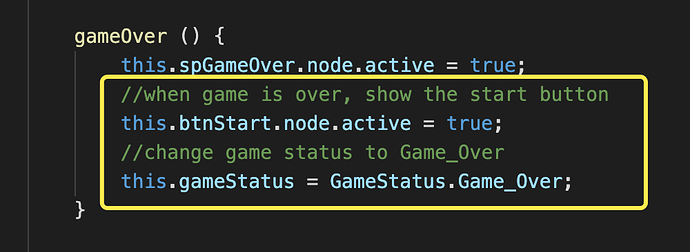
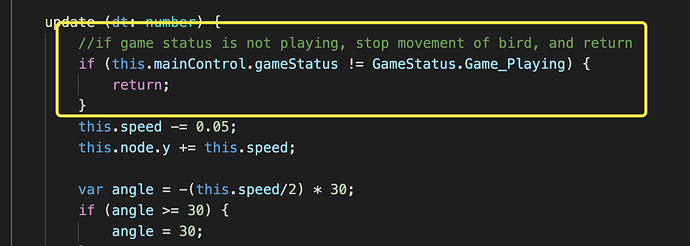
Save your progress
Save your changes in the text editor that you are using. Find the Save button in Cocos Creator and click Save once.
Tallying a score
This part of the our Flappy Bird tutorial series will add scoring. Why keep a score? Bragging rights, of course!
First, add a scoring Label node:

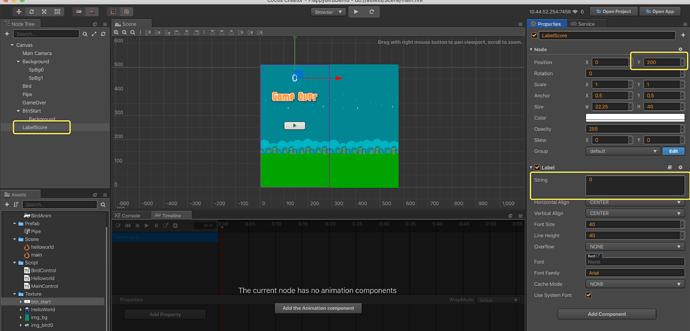
Second, create a Label text node called LableScore, set the Y coordinate, and bind it to the MainControl.ts script.
Third double-click the Pipe prefab to add a Collider component to the root node of the prefab.
Fourth, adjust the size of the Collider component so that the size of the collider is full of gaps. Set the tag property to 1 to distinguish it from the collider of the obstacle.

The width of the Collider component is recommended to be smaller than the width of the pipe, which will perform better.
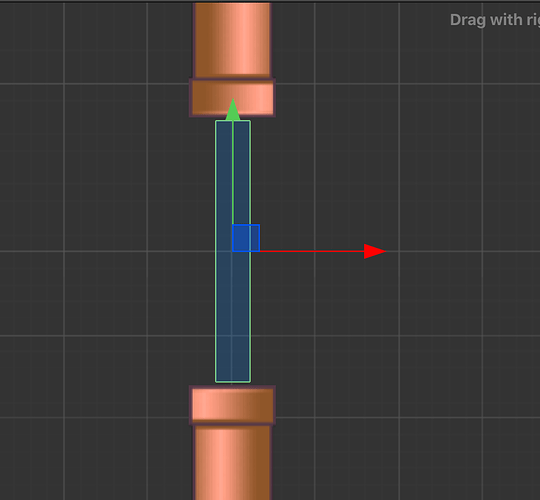
Fifth, add the following code to the MainControl.ts script:
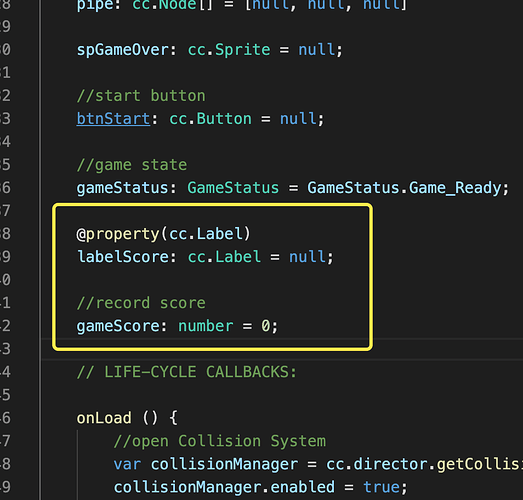
    @property(cc.Label)
    labelScore: cc.Label = null;

    // record score
    gameScore: number = 0;
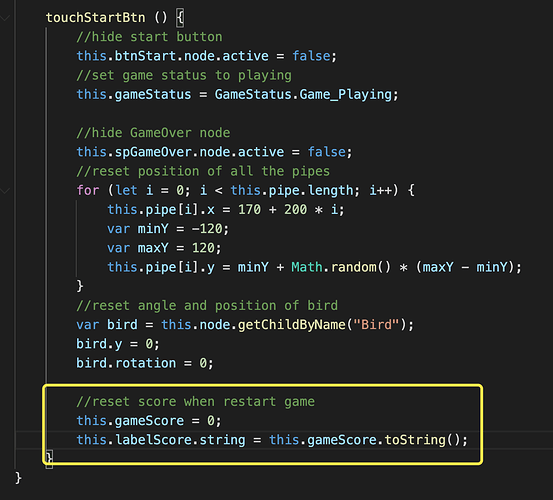
    // reset score when restart game
    this.gameScore = 0;
    this.labelScore.string = this.gameScore.toString();
Sixth, add the following code to the BirdControl.ts script:
onCollisionEnter (other: cc.Collider, self: cc.Collider) {
    // collider tag is 0, that means the bird have a collision with pipe, then game over
    if (other.tag === 0) {
        cc.log("game over");
        this.mainControl.gameOver();
        this.speed = 0;
    }
    // collider tag is 1, that means the bird cross a pipe, then add score
    else if (other.tag === 1) {
        this.mainControl.gameScore++;
        this.mainControl.labelScore.string = this.mainControl.gameScore.toString();
    }
}
Seventh, back in the Cocos Creator editor, set the labelScore property:

Save your progress
Save your changes in the text editor that you are using. Find the Save button in Cocos Creator and click Save once.
Adding background music
Note: It is crucial to understand the importance of Audio. Please make sure to read the Audio documentation
First, create an empty node named AudioSource.
Second, create a TypeScript named AudioSourceControl.ts, and bind the script on the newly created AudioSource node.
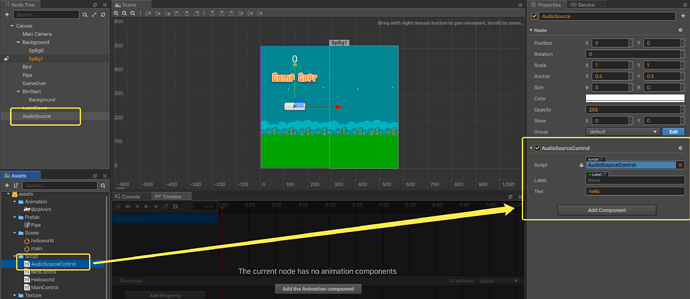
Third, add the following code to the AudioSourceControl.ts script:
const {ccclass, property} = cc._decorator;

// sound type enum
export enum SoundType {
    E_Sound_Fly = 0,
    E_Sound_Score,
    E_Sound_Die
}

@ccclass
export default class AudioSourceControl extends cc.Component {

    @property({type:cc.AudioClip})
    backgroundMusic: cc.AudioClip = null;

    // sound effect when bird flying
    @property({type:cc.AudioClip})
    flySound: cc.AudioClip = null;

    @property({type:cc.AudioClip})
    scoreSound: cc.AudioClip = null;

    @property({type:cc.AudioClip})
    dieSound: cc.AudioClip = null;

    // LIFE-CYCLE CALLBACKS:

    // onLoad () {}

    start () {
        // play background music
        cc.audioEngine.playMusic(this.backgroundMusic, true);
    }

    playSound (type: SoundType) {
        if (type == SoundType.E_Sound_Fly) {
            cc.audioEngine.playEffect(this.flySound, false);
        }
        else if (type == SoundType.E_Sound_Score) {
            cc.audioEngine.playEffect(this.scoreSound, false);
        }
        else if (type == SoundType.E_Sound_Die) {
            cc.audioEngine.playEffect(this.dieSound, false);
        }
    }

    // update (dt) {}
}
Fourth, return to the Cocos Creator editor, create a new folder named Sound, and import all music sound effects resources into this folder
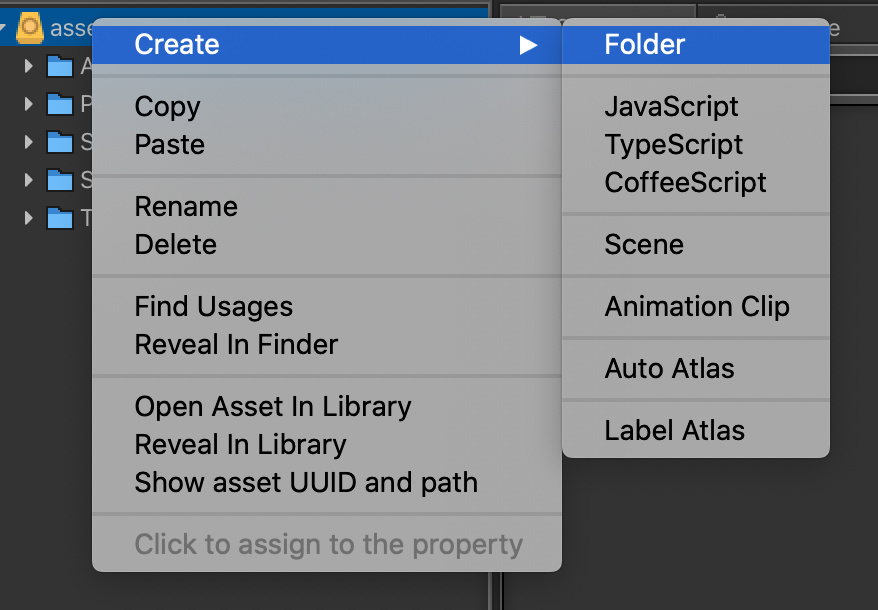
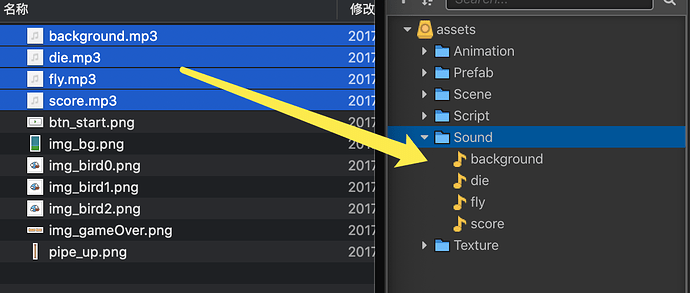
Fifth, bind the music sound effects resources to the script:
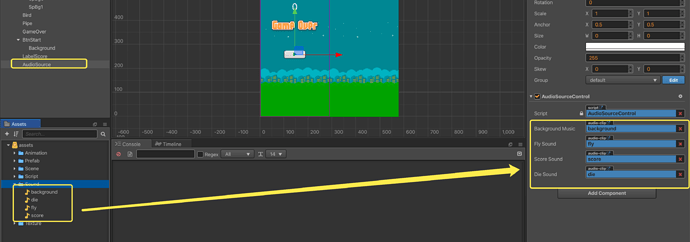
Save your progress
Save your changes in the text editor that you are using. Find the Save button in Cocos Creator and click Save once.
So where are we?
When you run the game you can hear background music!
Adding sound effects
We need to still trigger the corresponding sound effects at the corresponding time points.
First, add the audioSourceControl property in the MainControl.ts script.
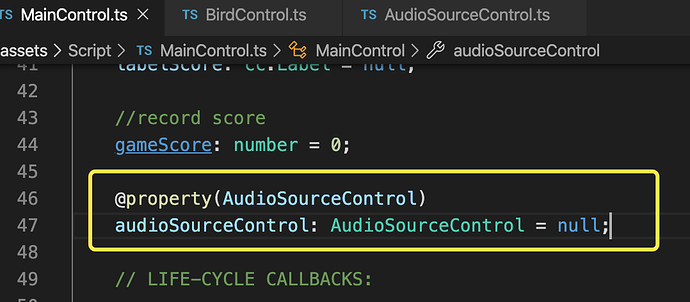
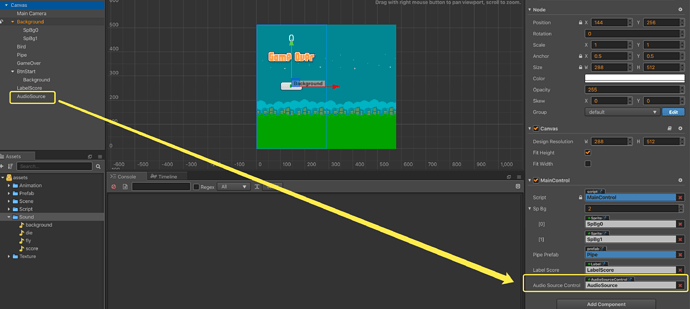
Second, add the following code to the MainControl.ts script:
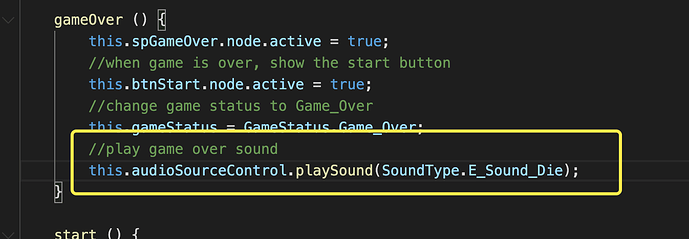
Third, add the following code to the BirdControl.ts script:
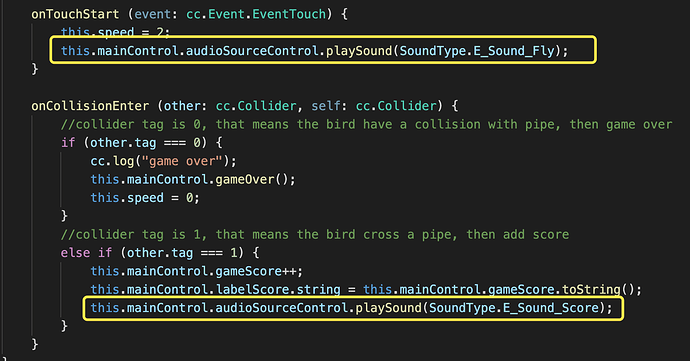
A few last steps!
Don’t forget to turn off the drawing of the debug information of the collision bodies:

Save your progress
Save your changes in the text editor that you are using. Find the Save button in Cocos Creator and click Save once.
Conclusion
WOW! You made it! I hope you enjoyed this tutorial on creating a Flappy Bird clone from scratch with Cocos Creator. Thanks again to game developer HuJun from our Chinese forum for the creation of the tutorial and Jason Slack-Moehrle for the translation of the tutorial.

