We have to thank the team at Tencent’s Online Education for this tutorial. They shared their work at our Guangzhou salon, and we wanted to share it with you. Their original tutorial has been translated into English for more exposure to this great project.
- Background
- Solution
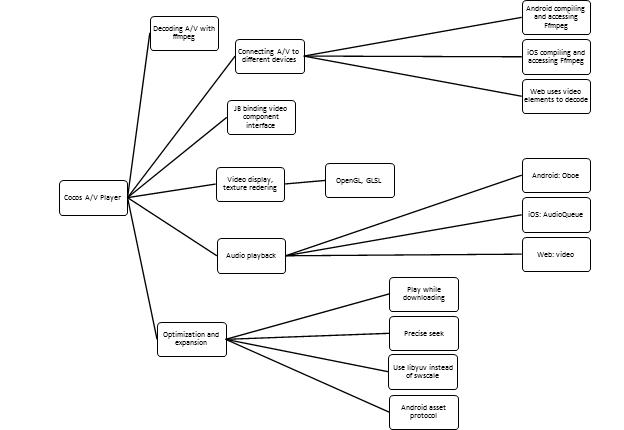
- Task breakdown
- Task details
4.1 ffplay on mobile terminal to play audio and video
4.2 JavaScriptB binding video component interface
4.3 Video display, texture rendering
4.4 Audio playback
4.5 Optimization and expansion - Results
- Reference documents
1. Background
There is a trend in China’s educational software to use a game engine for their apps. Tencent’s ABCMouse project uses Cocos Creator. Due to the implementation of the video component provided by the engine, the video component and the game interface are layered, which leads to the following problems:
- No other rendering components can be added to the video component.
- The mask component cannot be used to limit the video shape.
- There is an afterimage of video components when exiting the scene.
- and many more…
The core problem is a layering problem. The biggest drawback of the ABCMouse project is that Android, iOS, and web needs to be implemented separately, and the development and maintenance costs are high. Because of platform differentiation, there are still visual inconsistencies and inconsistent performance issues.
2. Solution

This is built this way because the ABCMouse project needs to be compatible with Android, iOS, and Web. Android and iOS are regarded as the same issues together, the solution has the following two points:
- The mobile phone can use the FFmpeg library to decode the video stream, and then use OpenGL to render the video, and use the respective audio interfaces of Android and iOS to play audio.
- The web client can directly use the
videoelements to decode the audio and video, and then use the WebGL to render video, and use thevideoelements to play audio.
3. Task breakdown

4. Task details
4.1 Decoding ffplay on mobile to play audio and video
From FFmpeg official source code, you can compile three executable programs, namely ffmpeg, ffplay, ffprobe:
ffmpegis used for audio, video and video format conversion, video cropping, etc.ffplayis used to play audio and video and needs to rely on SDL.ffprobeis used to analyze audio and video streaming media data.
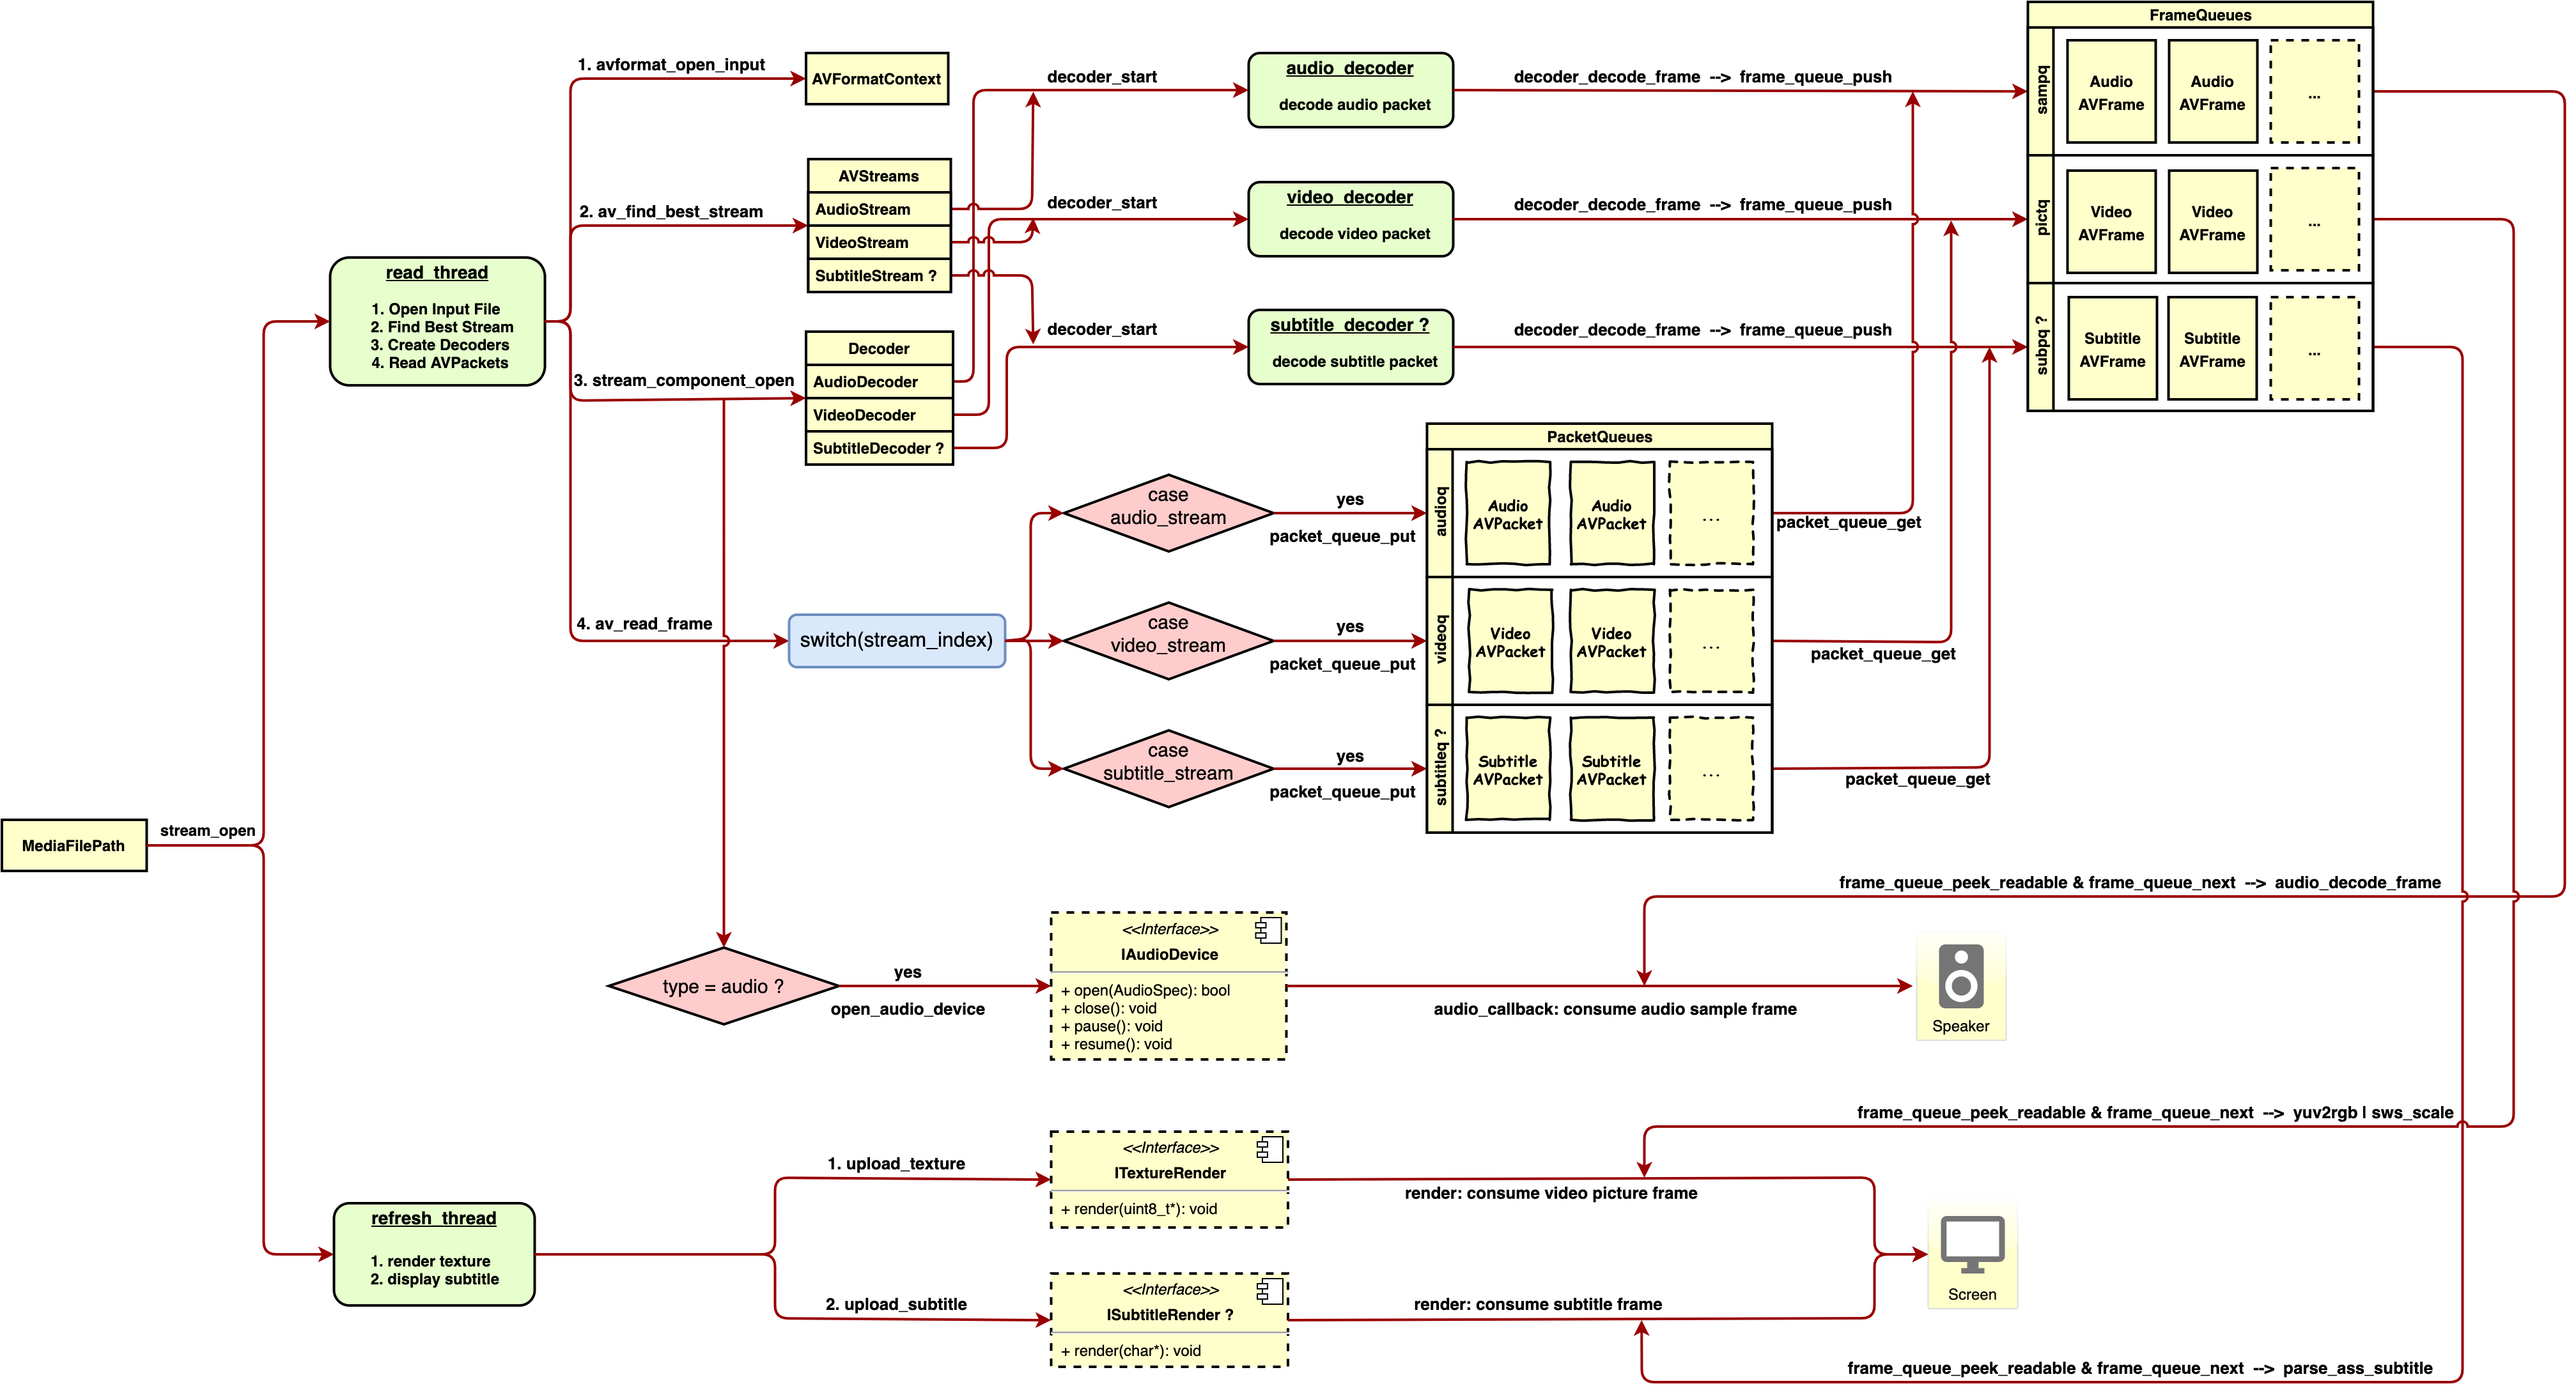
The ffplay program meets the needs of playing audio and video. In theory, as long as the SDL video display and audio playback interface is replaced with a mobile interface, the audio and video playback function of Cocos Creator can be created, but in the actual ffplay transformation process, I have encountered many minor problems, such as low efficiency of texture scaling and pixel format conversion using swscale on the mobile phone, and the problem of not supporting Android asset file reading, which will be solved later on. After a series of transformations, AVPlayer for Cocos Creator was born. The following is the analysis of AVPlayer’s audio and video playback process:

Summary:
- Call the
stream_openfunction, initialize the status information and data queue, and create read_thread and refresh_thread. - The main responsibility of
read_threadis to open streaming media, create decoding threads (audio, video, and subtitles), and read raw data. - The decoding thread respectively decodes the original data to obtain a sequence of video pictures, a sequence of audio samples, and a sequence of subtitle strings.
- In the process of creating the audio decoder, the audio device is turned on at the same time, and the generated audio samples will be continuously consumed during the playback process;
- The main responsibility of refresh_thread is to continuously consume video picture sequences and subtitle string sequences.
The AVPlayer UML after ffplay transformation is as follows:

Disclaimer: The process of ffplay transformation, SDL thread transformation and subtitle analysis were referenced using the ijkplayer source code used in bilibili.
4.2 JavaScriptB binding video component interface
This section is only for our mobile devices. For JavaScriptB related knowledge, please refer to the document in the references section: JavaScriptB 2.0 Binding Tutorial
Summarizing the functions of JavaScriptB
Binding JavaScript objects and other language objects through the interface exposed by ScriptEngine, allowing JavaScript objects to control other language objects.
Since the player logic is coded in C and C++, you need to bind JavaScript and C++ objects. The AVPlayer above is only responsible for the decoding and playback process, and the player also needs to handle input processing, video rendering, and audio playback, it encapsulates a class: video. It’s UML is as follows:

The JavaScript object bound by Video.cpp is declared as follows:
bool js_register_video_Video(se::Object *obj) {
    auto cls = se::Class::create("Video", obj, nullptr, _SE(js_gfx_Video_constructor));
    cls->defineFunction("init", _SE(js_gfx_Video_init));
    cls->defineFunction("prepare", _SE(js_gfx_Video_prepare));
    cls->defineFunction("play", _SE(js_gfx_Video_play));
    cls->defineFunction("resume", _SE(js_gfx_Video_resume));
    cls->defineFunction("pause", _SE(js_gfx_Video_pause));
    cls->defineFunction("currentTime", _SE(js_gfx_Video_currentTime));
    cls->defineFunction("addEventListener", _SE(js_gfx_Video_addEventListener));
    cls->defineFunction("stop", _SE(js_gfx_Video_stop));
    cls->defineFunction("clear", _SE(js_gfx_Video_clear));
    cls->defineFunction("setURL", _SE(js_gfx_Video_setURL));
    cls->defineFunction("duration", _SE(js_gfx_Video_duration));
    cls->defineFunction("seek", _SE(js_gfx_Video_seek));
    cls->defineFunction("destroy", _SE(js_cocos2d_Video_destroy));
    cls->defineFinalizeFunction(_SE(js_cocos2d_Video_finalize));
    cls->install();
    JavaScriptBClassType::registerClass<cocos2d::renderer::Video>(cls);

    __jsb_cocos2d_renderer_Video_proto = cls->getProto();
    __jsb_cocos2d_renderer_Video_class = cls;

    se::ScriptEngine::getInstance()->clearException();
    return true;
}

bool register_all_video_experiment(se::Object *obj) {
    se::Value nsVal;
    if (!obj->getProperty("gfx", &nsVal)) {
        se::HandleObject jsobj(se::Object::createPlainObject());
        nsVal.setObject(jsobj);
        obj->setProperty("gfx", nsVal);
    }
    se::Object *ns = nsVal.toObject();

    js_register_video_Video(ns);
    return true;
}
Summary: The above statement means that the following methods can be used in JavaScript code
let video = new gfx.Video();                // Construct

video.init(cc.renderer.device, {            // Initialize
    images: [],
    width: videoWidth,
    height: videoHeight,
    wrapS: gfx.WRAP_CLAMP,
    wrapT: gfx.WRAP_CLAMP,
});

video.setURL(url);                          // Set resource path
video.prepare();                            // Prepare function
video.play();                               // Play function
video.pause();                              // Pause function
video.resume();                             // Resume function
video.stop();                               // Stop function
video.clear();                              // Clear function
video.destroy();                            // Destroy function
video.seek(position);                       // Seek function

let duration = video.duration();            // Get video duration
let currentTime = video.currentTime();      // Get current time

video.addEventListener('loaded', () => {}); // Listen to the Meta loading completion event
video.addEventListener('ready', () => {});  // Listen for ready event
video.addEventListener('completed', () => {});  // Listen to the completed event
video.addEventListener('error', () => {});  // Listen to the error event
4.3 Video display, texture rendering
To realize the video display function, you need to understand the texture rendering process first. Since Cocos Creator uses OpenGL API on the mobile side and WebGL API on the Web side. OpenGL API and WebGL API are roughly the same, so you can go to the OpenGL website to learn about the texture rendering process.
Vertex shader:
#version 330 core
layout (location = 0) in vec3 aPos;
layout (location = 1) in vec2 aTexCoord;

out vec2 TexCoord;

void main()
{
    gl_Position = vec4(aPos, 1.0);
    TexCoord = vec2(aTexCoord.x, aTexCoord.y);
}
Fragment shader:
#version 330 core
out vec4 FragColor;

in vec2 TexCoord;

uniform sampler2D tex;

void main()
{
    FragColor = texture(tex, TexCoord);
}
Texture rendering program:
#include <glad/glad.h>
#include <GLFW/glfw3.h>
#include <stb_image.h>

#include <learnopengl/shader_s.h>

#include <iostream>

// Window size
const unsigned int SCR_WIDTH = 800;
const unsigned int SCR_HEIGHT = 600;

int main()
{
    // Initialize window
    // --------
    GLFWwindow* window = glfwCreateWindow(SCR_WIDTH, SCR_HEIGHT, "LearnOpenGL", NULL, NULL);
    ...

    // Compile and link shader programs
    // ----------------
    Shader ourShader("4.1.texture.vs", "4.1.texture.fs");

    // Set vertex attribute parameters
    // -------------
    float vertices[] = {
        // position                // Texture coordinates
         0.5f,  0.5f, 0.0f,   1.0f, 0.0f, // top right
         0.5f, -0.5f, 0.0f,   1.0f, 1.0f, // bottom right
        -0.5f, -0.5f, 0.0f,   0.0f, 1.0f, // bottom left
        -0.5f,  0.5f, 0.0f,   0.0f, 0.0f  // top left
    };

    // Set the index data. The graphics primitive drawn by this program is a triangle, and the picture is a rectangle, so it consists of two triangles
    unsigned int indices[] = {
        0, 1, 3, // first triangle
        1, 2, 3  // second triangle
    };

    // Declare and create VBO vertex buffer objects, VAO vertex array objects, index buffer objects
    // C language is not object-oriented programming, here uses an unsigned integer to represent objects
    unsigned int VBO, VAO, EBO;
    glGenVertexArrays(1, &VAO);
    glGenBuffers(1, &VBO);
    glGenBuffers(1, &EBO);

    // Bind the vertex object array to record the buffer object data set next, which is convenient for use in the rendering loop
    glBindVertexArray(VAO);

    // Binding vertex buffer object used to pass vertex attribute parameters
    glBindBuffer(GL_ARRAY_BUFFER, VBO);
    glBufferData(GL_ARRAY_BUFFER, sizeof(vertices), vertices, GL_STATIC_DRAW);

    // Bind the index buffer object, glDrawElements will draw graphics primitives in index order
    glBindBuffer(GL_ELEMENT_ARRAY_BUFFER, EBO);
    glBufferData(GL_ELEMENT_ARRAY_BUFFER, sizeof(indices), indices, GL_STATIC_DRAW);

    // Link vertex attributes: position, parameters: index, size, type, standardization, step, offset
    glVertexAttribPointer(0, 3, GL_FLOAT, GL_FALSE, 5 * sizeof(float), (void*)0);
    glEnableVertexAttribArray(0);

    // Link vertex attributes: texture coordinates, parameters: index, size, type, standardization, step, offset
    glVertexAttribPointer(1, 2, GL_FLOAT, GL_FALSE, 5 * sizeof(float), (void*)(3 * sizeof(float)));
    glEnableVertexAttribArray(1);


    // Generate texture objects
    // -------------------------
    unsigned int texture;
    glGenTextures(1, &texture);
    glBindTexture(GL_TEXTURE_2D, texture);

    // Set surround parameters
    glTexParameteri(GL_TEXTURE_2D, GL_TEXTURE_WRAP_S, GL_REPEAT);
    glTexParameteri(GL_TEXTURE_2D, GL_TEXTURE_WRAP_T, GL_REPEAT);

    // Set up texture filtering
    glTexParameteri(GL_TEXTURE_2D, GL_TEXTURE_MIN_FILTER, GL_LINEAR);
    glTexParameteri(GL_TEXTURE_2D, GL_TEXTURE_MAG_FILTER, GL_LINEAR);

    // Load picture
    int width, height, nrChannels;
    unsigned char *data = stbi_load(FileSystem::getPath("resources/textures/container.jpg").c_str(), &width, &height, &nrChannels, 0);
    if (data)
    {
    // Transfer texture data, parameters: target, level, internal format, width, height, border, format, data type, pixel array
        glTexImage2D(GL_TEXTURE_2D, 0, GL_RGB, width, height, 0, GL_RGB, GL_UNSIGNED_BYTE, data);
        glGenerateMipmap(GL_TEXTURE_2D);
    }
    else
    {
        std::cout << "Failed to load texture" << std::endl;
    }
    stbi_image_free(data);


    // Rendering loop

    while (!glfwWindowShouldClose(window))
    {
        // Clean up
        // ---
        glClearColor(0.2f, 0.3f, 0.3f, 1.0f);
        glClear(GL_COLOR_BUFFER_BIT);

        // Bind Texture
        glBindTexture(GL_TEXTURE_2D, texture);

        // Apply shader program
    ourShader.use();

        // Bind Vertex Array Object
        glBindVertexArray(VAO);

        // Draw triangle primitives
        glDrawElements(GL_TRIANGLES, 6, GL_UNSIGNED_INT, 0);

        // glfw swap buffer
        glfwSwapBuffers(window);
    }

    // Clean up objects
    // --------------------------------------------
    glDeleteVertexArrays(1, &VAO);
    glDeleteBuffers(1, &VBO);
    glDeleteBuffers(1, &EBO);

    // End
    // ---------------------------------------------
    glfwTerminate();
    return 0;
}
Simple texture rendering process:
- Compile and link shader programs.
- Set the vertex data, including the position and texture coordinate attributes (it is worth noting that the position coordinate system is different from the texture coordinate system, which will be described below).
- Set index data - the index is used to refer to when drawing graphics primitives.
- Create vertex buffer objects, index buffer objects, vertex array objects, and bind and pass values.
- Link vertex attributes.
- Create and bind texture objects, load images, and transfer texture pixel values.
- Let the program enter the rendering loop, bind the vertex array object in the loop, and draw graphics primitives.
The position coordinate system described in point 2 is different from the texture system. The specific differences are as follows:

- The origin of the position coordinate system (0, 0) is at the center, and the value range of x, y is from -1 to 1;
- The origin of the texture coordinate system (0, 0) is in the upper left corner, and the range of x, y is 0 to 1;
Using Cocos Creator 2.X version, custom rendering components are divided into three steps:
- Custom material (the material is responsible for the shader program);
- Custom Assembler (Assembler is responsible for passing vertex attributes);
- Set the material dynamic parameters, such as texture setting, transformation, translation, rotation, and scaling matrix.
Step 1: The shader program needs to be written in the effect file, and the effect is used by the material. Each rendering component needs to mount the material property. Since the video display can be understood as a picture frame animation rendering, you can directly use the builtin-2d-sprite material used by CCSprite provided by Cocos Creator.
Step 2: After you have the material, you only need to care about the position coordinates and texture coordinate transfer. That means you need to customize the Assembler. You can refer to the official document to customize the Assembler.
For efficiency, use the official source code. It is worth noting that the native and web world coordinates of the calculation method (updateWorldVerts) are different. Otherwise, there will be a problem with disordered placement. Directly paste the code:
export default class CCVideoAssembler extends cc.Assembler {
    constructor () {
        super();
        this.floatsPerVert = 5;
        this.verticesCount = 4;
        this.indicesCount = 6;
        this.uvOffset = 2;
        this.colorOffset = 4;
        this.uv = [0, 1, 1, 1, 0, 0, 1, 0]; // left bottom, right bottom, left top, right top
        this._renderData = new cc.RenderData();
        this._renderData.init(this);

        this.initData();
        this.initLocal();
    }

    get verticesFloats () {
        return this.verticesCount * this.floatsPerVert;
    }

    initData () {
        this._renderData.createQuadData(0, this.verticesFloats, this.indicesCount);
    }

    initLocal () {
        this._local = [];
        this._local.length = 4;
    }

    updateColor (comp, color) {
        let uintVerts = this._renderData.uintVDatas[0];
        if (!uintVerts) return;
        color = color || comp.node.color._val;
        let floatsPerVert = this.floatsPerVert;
        let colorOffset = this.colorOffset;
        for (let i = colorOffset, l = uintVerts.length; i < l; i += floatsPerVert) {
            uintVerts[i] = color;
        }
    }

    getBuffer () {
        return cc.renderer._handle._meshBuffer;
    }

    updateWorldVerts (comp) {
        let local = this._local;
        let verts = this._renderData.vDatas[0];

        if(CC_JavaScriptB){
            let vl = local[0],
            vr = local[2],
            vb = local[1],
            vt = local[3];
            // left bottom
            verts[0] = vl;
            verts[1] = vb;
            // right bottom
            verts[5] = vr;
            verts[6] = vb;
            // left top
            verts[10] = vl;
            verts[11] = vt;
            // right top
            verts[15] = vr;
            verts[16] = vt;
        }else{
            let matrix = comp.node._worldMatrix;
            let matrixm = matrix.m,
                a = matrixm[0], b = matrixm[1], c = matrixm[4], d = matrixm[5],
                tx = matrixm[12], ty = matrixm[13];

            let vl = local[0], vr = local[2],
                vb = local[1], vt = local[3];

            let justTranslate = a === 1 && b === 0 && c === 0 && d === 1;

            if (justTranslate) {
                // left bottom
                verts[0] = vl + tx;
                verts[1] = vb + ty;
                // right bottom
                verts[5] = vr + tx;
                verts[6] = vb + ty;
                // left top
                verts[10] = vl + tx;
                verts[11] = vt + ty;
                // right top
                verts[15] = vr + tx;
                verts[16] = vt + ty;
            } else {
                let al = a * vl, ar = a * vr,
                bl = b * vl, br = b * vr,
                cb = c * vb, ct = c * vt,
                db = d * vb, dt = d * vt;

                // left bottom
                verts[0] = al + cb + tx;
                verts[1] = bl + db + ty;
                // right bottom
                verts[5] = ar + cb + tx;
                verts[6] = br + db + ty;
                // left top
                verts[10] = al + ct + tx;
                verts[11] = bl + dt + ty;
                // right top
                verts[15] = ar + ct + tx;
                verts[16] = br + dt + ty;
            }
        }
    }

    fillBuffers (comp, renderer) {
        if (renderer.worldMatDirty) {
            this.updateWorldVerts(comp);
        }

        let renderData = this._renderData;
        let vData = renderData.vDatas[0];
        let iData = renderData.iDatas[0];

        let buffer = this.getBuffer(renderer);
        let offsetInfo = buffer.request(this.verticesCount, this.indicesCount);

        // fill vertices
        let vertexOffset = offsetInfo.byteOffset >> 2,
            vbuf = buffer._vData;

        if (vData.length + vertexOffset > vbuf.length) {
            vbuf.set(vData.subarray(0, vbuf.length - vertexOffset), vertexOffset);
        } else {
            vbuf.set(vData, vertexOffset);
        }

        // fill indices
        let ibuf = buffer._iData,
            indiceOffset = offsetInfo.indiceOffset,
            vertexId = offsetInfo.vertexOffset;
        for (let i = 0, l = iData.length; i < l; i++) {
            ibuf[indiceOffset++] = vertexId + iData[i];
        }
    }

    updateRenderData (comp) {
        if (comp._vertsDirty) {
            this.updateUVs(comp);
            this.updateVerts(comp);
            comp._vertsDirty = false;
        }
    }

    updateUVs (comp) {
        let uv = this.uv;
        let uvOffset = this.uvOffset;
        let floatsPerVert = this.floatsPerVert;
        let verts = this._renderData.vDatas[0];
        for (let i = 0; i < 4; i++) {
            let srcOffset = i * 2;
            let dstOffset = floatsPerVert * i + uvOffset;
            verts[dstOffset] = uv[srcOffset];
            verts[dstOffset + 1] = uv[srcOffset + 1];
        }
    }

    updateVerts (comp) {
        let node = comp.node,
            cw = node.width, ch = node.height,
            appx = node.anchorX * cw, appy = node.anchorY * ch,
            l, b, r, t;
        l = -appx;
        b = -appy;
        r = cw - appx;
        t = ch - appy;

        let local = this._local;
        local[0] = l;
        local[1] = b;
        local[2] = r;
        local[3] = t;
        this.updateWorldVerts(comp);
    }
}
Step 3: set the material dynamic parameters. In the video player, the texture data needs to be dynamically modified. On the mobile terminal, the AVPlayer modified by ffplay is called to void Video through the ITextureRenderer.render(uint8_t) interface during the playback process:. The :setImage(const uint8_t *data) method is actually constantly updating the texture data. The code is as follows:
void Video::setImage(const uint8_t *data) {
    GL_CHECK(glActiveTexture(GL_TEXTURE0));
    GL_CHECK(glBindTexture(GL_TEXTURE_2D, _glID));
    GL_CHECK(
            glTexImage2D(GL_TEXTURE_2D, 0, _glInternalFormat, _width, _height, 0, _glFormat,
                         _glType, data));
    _device->restoreTexture(0);
}
On the web side, the video element is passed in each frame of the CCVideo rendering component, the code is as follows
let gl = cc.renderer.device._gl;
this.update = dt => {
    if(this._currentState == VideoState.PLAYING){
        gl.bindTexture(gl.TEXTURE_2D, this.texture._glID);
        gl.texImage2D(gl.TEXTURE_2D, 0, gl.RGBA, gl.RGBA, gl.UNSIGNED_BYTE, this.video);
    }
};
At this point, the video displaying section is over.
4.4 Audio playback
Before transforming the audio playback process, ijkplayer’s audio playback plan could be an ideal solution.
ijkplayer has two solutions on the Android side: AudioTrack and OpenSL ES.
- AudioTrack belongs to the way of synchronously writing data, which belongs to the “push” scheme. Google’s first approach is estimated to be relatively stable. Since AudioTrack is a Java interface, C++ calls require reflection, which theoretically affects efficiency.
- OpenSL ES can do the “pull” solution, but Google said in the official document that it doesn’t do much compatibility with the OpenSL ES interface, which may not be reliable.
ijkplayer also has two solutions on the iOS side: AudioUint and AudioQueue. Since I am not familiar with iOS development and do not know the difference between them, I will not expand on it.
In the audio playback transformation of Cocos Creator, we chose Google’s latest Google Oboe solution with an extremely low response delay on the Android side. Oboe is a package collection of AAudio and OpenSL ES with more powerful functions and a more user-friendly interface. I chose AudioQueue on the iOS side. If you want to ask why, it’s because the interface of iOS AudioQueue is more similar to the interface provided by Android Oboe…
The audio playback model belongs to the producer consumer model. When the audio device is turned on, it will continuously pull audio samples generated by the audio decoder.
The audio playback interface is not complicated. It is mainly used to replace the SDL audio-related interface in the ffplay program. The specific interface code is as follows:
#ifndef I_AUDIO_DEVICE_H
#define I_AUDIO_DEVICE_H

#include "AudioSpec.h"

class IAudioDevice {

public:

    virtual ~IAudioDevice() {};

    virtual bool open(AudioSpec *wantedSpec) = 0;  // Turn on the audio device. The AudioSpec structure contains pull callbacks
    virtual void close() = 0;                      // Turn off audio output

    virtual void pause() = 0;                      // Pause audio output

    virtual void resume() = 0;                     // Restore audio output

    AudioSpec spec;
};

#endif //I_AUDIO_DEVICE_H
4.5 Optimization and expansion
4.5.1 Play from download
It can be said to be a necessary function of audio and video players. Not only can it save user traffic, but it also can increase the speed of secondary opening. The most common way to implement side-by-side broadcasting is to establish a proxy server on the client-side, and only need to modify the resource path passed by the player to achieve decoupling of the playback function and the download function. In theory, however, establishing a proxy server will increase the memory and power consumption of mobile devices.
Next, another more straightforward and easier-to-use solution: use the protocol combination provided by FFmpeg to realize the edge-down broadcast
When consulting the FFmpeg official protocol document, some protocols support combined use, as follows:
cache:http://host/resource
Here, the cache protocol is added in front of the HTTP protocol. That is, you can use the official playback process to cache the watched section. Due to the file path problem generated by the cache protocol, the mobile phone is not applicable, and this function is not available. Play function to the side below.
But it can be concluded that by adding your protocol in front of other protocols, you can hook other protocol interfaces, to sort out an avcache protocol that broadcasts below:
const URLProtocol av_cache_protocol = {
        .name                = "avcache",
        .url_open2           = av_cache_open,
        .url_read            = av_cache_read,
        .url_seek            = av_cache_seek,
        .url_close           = av_cache_close,
        .priv_data_size      = sizeof(AVContext),
        .priv_data_class     = &av_cache_context_class,
};
In the av_cache_read method, call the read method of other protocols. After obtaining the data, write the file and store the download information, and return the data to the player.
4.5.2 libyuv replace swscale
YUV is a color-coding method. Most YUV formats use less than 24 bits per pixel on average to save bandwidth, so generally, videos are encoded in YUV colors. YUV is divided into two formats, compact format, and flat format. The plane format stores the three components of Y, U, and V in different matrices.
According to the above, if the fragment shader directly supports YUV texture rendering, the number of sampler2D texture samplers required by the fragment shader is different in different formats, so it is quite inconvenient to manage. The simplest way is to convert the YUV color code to RGB24 color code, so you need to use the swscale provided by FFmpeg.
But after using swscale (with the FFmpeg coding option neon optimization turned on) for color-coding conversion, you can find that swscale is inefficient on the mobile side. A Xiaomi Mix 3 device, 1280x720 resolution video, pixel format from AV_PIX_FMT_YUV420P to AV_PIX_FMT_RGB24, zoom was used.
According to the secondary linear sampling, the average time is as high as 16 milliseconds, and the CPU usage is quite high. After searching on Google, an alternative to Google’s libyuv could be used. The project can be referenced here
Official optimization instructions:
- Optimized for SSSE3/AVX2 on x86/x64
- Optimized for Neon on Arm
- Optimized for MSA on Mips
After using libyuv for pixel format conversion, using Xiaomi Mix 3 device, 1280x720 resolution video, the pixel format is converted from AV_PIX_FMT_YUV420P to AV_PIX_FMT_RGB24, scaling is based on quadratic linear sampling, the average time is eight milliseconds, and the relative swscale is reduced by half.
4.5.3 Android asset protocol
Since the local audio and video resources of Cocos Creator will be packaged in the asset directory on the Android side, the resources in the asset directory need to be opened using AssetManager, so the Android asset protocol needs to be supported. The specific protocol statement is as follows:
const URLProtocol asset_protocol = {
        .name                = "asset",
        .url_open2           = asset_open,
        .url_read            = asset_read,
        .url_seek            = asset_seek,
        .url_close           = asset_close,
        .priv_data_size      = sizeof(AssetContext),
        .priv_data_class     = &asset_context_class,
};


